WiFi Hacking with Denial of Service (DoS) attack. Inevitably, as a wireless security professional, you will run into situations where all your complex WiFi hacking techniques fail.
You’ve run through all the command options, all of the tools. You’ve tried a dictionary attack, a WPS attack, and a precomputed attack. You’ve even tried spoofing the access point to trick others into connecting to yours and giving up the keys. You have done everything right, but still have failed. You’re defeated. Angry. Vengeful. God damn it, this secure wireless network is really pissing you off. You want to take it down. And I’m going to let you in on a little secret. Most wireless security analysts would stop right here, go to the network owners, and proudly declare “Your WiFI network has weathered all WiFi hacking techniques. There’s no way anyone is going to hack WiFi here, now about that fee…”
Here’s another secret. In order to become a really good wireless security expert, you shouldn’t just stop there. So what if WiFI hacking didn’t work… Because a lot of hackers follow the mantra, If you can’t hack it, DoS it.
WiFi Hacking Doesn’t Always Require Unauthorized Access
Not always, anyway. As I mentioned above, many black hats out there will simply resort to a denial of service attack against your wireless network if they’re unable to break into it. A denial of service attack is basically a sudden and sustained flood of traffic directed at another network device. It’s a dirty trick, and one that isn’t very subtle. In fact, denial of service attacks are loud and sloppy. Most black hat hackers are just in it for the yucks anyway. They’ll bring a wireless network down using sheer force if it’ll get them off.
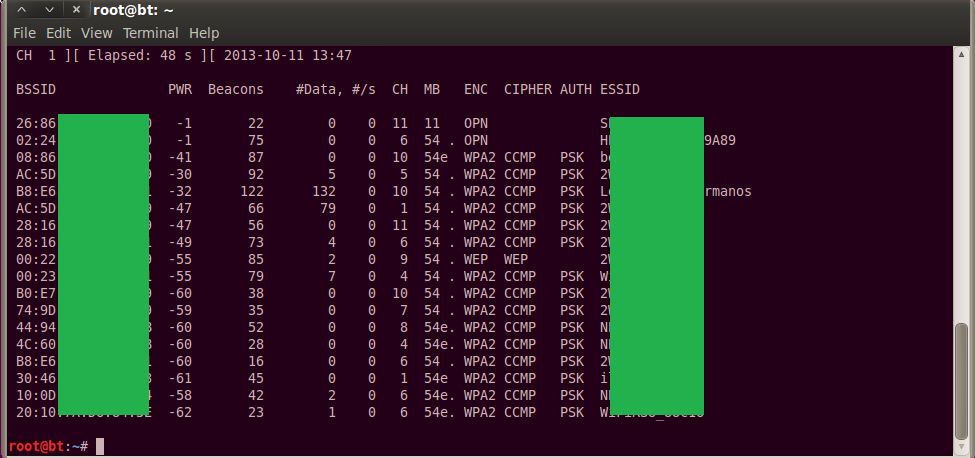
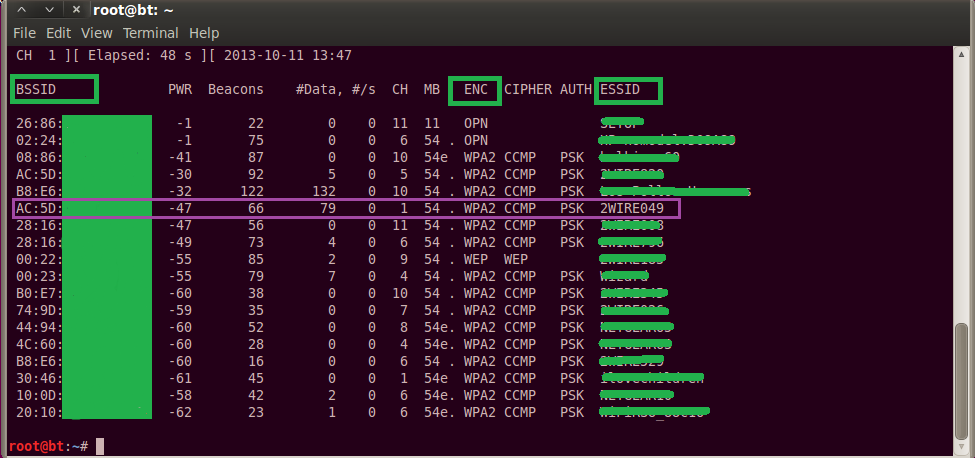
The attacker will start off by performing some recon on the wireless network. At this stage, they’ll sniff around, may try to authenticate to the wireless access point, and they may send deauth packets to legitimate clients connected to the access point. If they do, watch out! You really should be capturing logs off the access point and reviewing them regularly. This is absolutely critical to stopping WiFi hacking attacks before they get anywhere.
Again, if an attacker fails to crack the wireless key, he may just DoS the whole network. And with wireless, this is very easy to do. It’s scary easy. I’m afraid. You should be too. Aahh.
In this scenario, we’re going to use the MDK3 network stressing utility. Network stressing is the legitimized word for denial of service. Security analysts use network stressing tools to determine how susceptible their networks are to denial of service attacks. Keep reading for a comprehensive MDK3 tutorial.
Use MDK3 for DoS WiFi Hacking Tests
MDK3 stands for Murder Death Kill 3. And it’s a tool that definitely lives up to its name. Because it’s designed specifically for WLAN environments, MDK3 does a marvelous job at crushing wireless network access by sending floods of traffic all at once. The flood of traffic prevents others from being able to connect.
Imagine you are a CEO of a small business. You’re traveling for work, and connected to the hotel’s WiFi connection. It’s vital that you get some information send out tonight. But what happens when your competitor is sitting in the room next door, and he’s slamming your laptop with mdk3 packets? You won’t be able to get anything done, that’s what. You may lose important contracts as a result. Your business may suffer. So now you see just how dangerous denial of service attacks can be. They don’t destroy data or steal it, but they are perfect tools for reputation assassination.
Getting Started with MDK3 – DoS WiFi Hacking
As a prerequisite, make sure your wireless adapter is in packet injecting mode, otherwise this won’t work right at all.
To put the wifi adapter into packet injecting mode, look at the link above or use the syntax below to get an idea:
airmon-ng start <wireless interface>

Let’s test our wireless AP, named “WiFi hacking” against wireless DoS attacks. MDK3 is installed by default in the latest versions of Back Track and Kali Linux. To access the tool from Back Track 5 R3, go to Applications -> Back Track -> Stress Testing -> WLAN Stress Testing. Select MDK3 from the list. To access it from Kali Linux,
MDK3 should launch with the help menu already printed on the screen.
Be sure to go through the list of test modes one by one. Don’t be a shitty security professional, be a damn good one. KNOW how this stuff works. Because while MDK3 is an awesome proof-of-concept tool, it does not have a man page and the help options are somewhat limited. You’re pretty much on your own with this tool. But embrace it and learn this tool the old fashioned way, by trial and error. More verbose help is available by running:
mdk3 –fullhelp
SSID Flooding with MDK3
One neat trick that MDK3 can do is SSID flooding, or beacon flooding. What this means is that MDK3 can broadcast hundreds or even thousands of fake access points. Others that are in the area will see all of these fake access points when they go to search for WiFi access points to connect to. As you can probably see, SSID flooding is not denial of service. However, this is still a pretty cool trick. Potentially, you could set up a dedicated computer with a wireless access point and have MDK3 running in SSID flooding mode at all times. You could, in effect, hide your legitimate wireless access point in a sea of fake access points. A sort of security through obscurity to prevent WiFi hacking attacks.
Here is the syntax to enable simple SSID flooding (MDK3 will generate random fake access point names:
mdk3 <interface> b -c 1
Just replace <interface> with the name of your wireless interface. Remember, usually it’s monO.
The b option tells MDK3 to use beacon/SSID flooding mode.
-c1 tells MDK3 to broadcast all the fake access points on channel 1. (To better hide the fact these are all fake access points, you can try running multiple instances of MDK3 and specify a different channel each time.
You can also specify a list of specific SSID names from a file by appending the command above with:
-f <file name>
Let’s say your business’s wireless AP broadcasts as “ACME Business”. You want to use MDK3′s SSID flooding mode to hide your access point amongst a bunch of similarly named but decoy access points. You could create a text file named “SSIDs” and fill with fake access point names, perhaps names like “ACME WiFi” “ACME Network” “WiFi ACME”. Then, to bring this all together, you can simply run:
mdk3 <interface> b -c 1 -f SSIDs
There are tons of possible options for the SSID flooding mode:
b – Beacon Flood Mode
This spoofs tons of SSIDs. Remember, security through obscurity
OPTIONS:
-n <ssid>
Use a specific SSID <ssid> instead of randomly generated ones
-f <filename>
Read SSIDs from a file
-v <filename>
Read MAC addresses and SSIDs from a file.
-d
Display Ad-Hoc APs
-w
Set WEP bit (Generates encrypted networks)
-g
Display APs as 54 Mbit
-t
Display APs using WPA TKIP encryption
-a
Display APs using WPA AES encryption
-m
Use valid accesspoint MAC from OUI database
-h
Hop to the channel where the AP is spoofed
-c <chan>
Fake an AP on a channel <chan>.
-s <pps>
Set the DoS speed in packets per second (the default: 50)
Authentication Flooding with MDK3
Moving on to MDK3′s actual DOS options, you will first look at authentication flooding, then conclude with deauthentication flooding. The idea behind authentication flooding is simple. Too many authentication requests at one time may cause the wireless access point to freeze up and perhaps stop working entirely (until someone reboots the thing, that is).
I will warn you that in my experience, authentication flooding doesn’t always work. Most wireless access points are robust enough to handle an authentication flood from one instance of MDK3. (However, if you had multiple laptops running authentication floods this may work.)
Deauthentication flooding works MUCH better (that’s why I am saving it for last) and it doesn’t require the resources that authentication flooding does. So let’s look at authentication flooding. A simple command to do authentication flooding is:
mdk3 <interface> a -a <ap_mac address>
All you need is the AP’s MAC address as you can see above.
The list of all possible options are below:
a – Authentication DoS mode

Send authentication frames to all APs found in range. By flooding the target AP with authentication requests, we can try to knock it offline.

OPTIONS:

-a <ap_mac address>

You need the access point’s MAC address, which can be obtained with airodump

-m

Use a valid client MAC from OUI database

-c

Don’t check that the test was successful, just run the attack

-i <ap_mac>

Performs an intelligent test on the access point (-a and -c will be ignored). This test connects clients to the AP and reinjects sniffed data to keep them alive

-s <pps>

Sets the speed in packets per second (Default: unlimited)
Deauthentication Flooding with MDK3
The DoS WiFi hacking technique that works best uses deauthenticate requests rather than faking authentication requests.
mdk3 <interface> d -b blacklist_file
Again, the only thing you need is the target access point’s MAC address. Save that MAC address in a text file and specify it after the -b option. This will sent deauth packets to any and all clients connected to the access point specified in the file. (You can add more MAC addresses to deauth if you are evaluating multiple APs in range.
d – Deauthentication / Disassociation Amok Mode

Kicks everybody found from AP

OPTIONS:

-w <filename>

Read file containing MAC addresses to ignore (Whitelist mode)

-b <filename>

Read from a file containing MAC addresses to attack (Blacklist Mode)

-s <pps>

Set the speed in packets per second (Default: unlimited)

-c [chan,chan,chan,...]

Enables channel hopping. Without providing any channels, mdk3 will hop all channels until it finds the target you specified
So there you have it. Multiple ways to perform DoS WiFi hacking attacks using the MDK3 utility. Good luck in your penetration testing and network security careers!